Shabby Blogs

Wednesday 31 January 2018

Birthday Balloons

Good morning crafty friends, I hope you are having a good week. Can you believe that we are at the end of January already ??? where did that go lol.


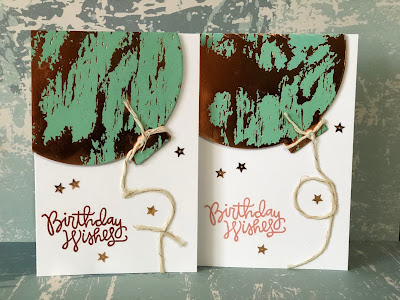
Today's cards were an idea that popped in to my head that I decided to give a try, using the string of balloons to make the age number of the recipient.


It ended up being very fiddly, so I don't think I will rush to try it again, but I am happy with how these turned out. 


I have recently signed up to a new monthly kit, from Hobby base, and the foiled card and twine came in that kit. I used an MFT Stamps, Dienamics die to cut the balloon shape, and raised them on foam tape onto 6 x 4 card blanks.


I shaped the twine into the numbers and then covered them in PVA glue, once they were dry, they were pretty much stuck in the shape, so I could glue them to my cards and tie a knot around the balloon end.


Then I heat embossed a sentiment and added a few sequin stars to finish.

Hope you like them, take care and I'll see you soon.

xxx

Tuesday 30 January 2018

Pandas on parade

Hello again.
Today's card was made for my nephew's 12th birthday.


I started with an inked background using Distress Oxides. I used Picked Raspberry, Faded Jeans and Black Soot.  I then added Sheer Shimmer Spritz in Sparkle.


The panda's are from Mama Elephant's Pandamonium set and I added some of the small elements in the set - the balloon and lanterns.


I coloured these with Copic markers and added some Wink of Stella over the top.


The finishing touch was the gold embossed sentiment.

I really like this playful little card and hope you do too.

TTFN Jude xx

Monday 29 January 2018

You Rock

Good morning all, I hope you have had a nice crafty weekend. I didn't manage to get much achieved this weekend, but I have had a little play lol.


Saturday was my eldest grandson's 12th birthday, and this is one of the cards I made for him. I started with the background, using an image from my Silhouette software, and printed it on the laser printer. Then I ran it through the Minc machine with silver foil.


The main image is from a recent issue of Creative Stamping magazine, I stamped it with black pigment ink, and then heat embossed it with black embossing powder.


I cut the image out with an Avery Elle Wonky Stitched Rectangle die, and then raised it with craft foam above the shiny background.


Then I gave it a red mat before popping it all on a black 6 x 6 card blank.


Hope you like it, take care and I'll see you soon.

xxx
Friday 26 January 2018

Balloons

Hello and welcome.
I'm back again with another simple design.


This balloon stamp is from the It's No Secret stamp set by Simon Says Stamp.
This is a lovely set that has messages you can stamp in the balloons and add a scratch off sticker.
I haven't tried this yet but I will.


I lightly inked a sky before adding the balloons, which were stamped with Distress Inks and covered in Wink of Stella.


I cut a cloud die and stamped my sentiment on it.  This was layered at the bottom of the card.


The finishing touches were drops made with Caribbean Ocean Nuvo Drops.  These match very well with the peacock feathers distress ink.

TTFN Jude xx

Thursday 25 January 2018

Flower Turnabout

Good morning all, sorry I'm late again, I really can't get my head focused lately lol. Anyway, today is my beautiful daughter-in-laws birthday, and this is the card I made for her from mum. Happy Birthday Staci xxxxx


I made this using the Concord & 9th, Flower Turnabout Stamp set. I used our MISTI stamp tool to help with the positioning, and using Versamark ink, I stamped the flowers 4 times.


After each rotation, I used embossing powder over the Versamark, SSS - Rose Gold, Cosmic Shimmer - Bright Gold, Ranger - Liquid Platinum, and WOW - Cloud 9.


The card is really sparkly and textured, but difficult to capture on the camera.


The sentiment is from a Honey Bee Stamps set called Happiness. I stamped it with Versamark, and then heat embossed with the Rose Gold powder. Then I added it all to a 6 x 6 card blank and finished with a few drops of Liquid Pearls in Rose Gold.


Hope you like it, take care and I'll see you soon.

xxx

Wednesday 24 January 2018

Unicorn clouds

Hello again.  You'll have to forgive the poor pictures of today's card.  The light wasn't good and the background cardstock is shiny - not a good combination.


Anyway this is quite a simple design and very easy to replicate.  I used one stamp set, a cloud die and a few Copic markers.


I coloured the unicorn with pinks and purples then chose cardstock to match.


I cut several cloud borders and layered them using foam tape.


The finishing touch was a few heart stamps.  


This card is for a 7 year old girl who informs me that, apart from giraffes, unicorns are her favourite animal, lol.  Hope she likes it.  

TTFN Jude xx


Tuesday 23 January 2018

Magical Birthday Wishes

Good morning all, I hope you have had a good weekend, and are having a good week so far.


Today's card is the one I made for a little girl who turned 7 yesterday. Her favourite animals are giraffes and unicorns, so I thought this was a safe bet lol.


I used Distress Oxide inks to create the background panel, Fossilized Amber, Picked Raspberry, and Broken China. These three give this lovely rainbow effect by creating other colours where they overlap.


The images are both Lawn Fawn, the unicorn is from the Critters Ever After set, and the fairy is from the Fairy Friends set.


I coloured them with Copic markers and then cut them out with their matching dies. I cut the panel with an Avery Elle, Wonky Stitched Ellements die, and cut an aperture with a star die. 


Then I added it all to a bright pink card blank using foam tape to raise the panel, and heat embossed a Lawn Fawn Scripty Saying stamp onto black card for the sentiment.


After I had taken the photos I couldn't resist adding a few coloured sequins and a number 7 lol.

Hope you like it, take care and I'll see you soon.

xxx

Monday 22 January 2018

Perennial beauty

Happy Monday.  I hope you had a good weekend.


Today's card uses one of my Christmas gifts - Perennial Beauty by Altenew.  I stamped it using the Cherry Blossom ink set also from Altenew and two leaves using colours from the Green Fields set.


I stamped the sentiment from the set onto a plain card blank and stencilled lightly with one of the pink inks.  I then arranged the flower and leaves to the side.


The finishing touch was some rose gold liquid pearls.


I'm really happy with the finished card.  Hope you like it too.

TTFN Jude xx


Friday 19 January 2018

Go Bananas

Good morning folks, apologies for this being late, but I really couldn't get moving today !


Anyway, today's card is a really simple stamped card, for a very special young man who turns 12 next week.


I used the stamp set called Safari Friends, that came free with issue 145 of Papercraft Essentials. It's a great set, with cute critters and people, a few different sentiments, and an embossing folder.


I stamped the vines with Altenew Crisp Dye ink using Parrot, from the Tropical Forest set.


Then I stamped the monkey with Memento Rich Cocoa ink, and coloured him with Copic markers.


The grass is cut from thick olive card using the MFT Grassy Edges dies, and layered to show the different lengths.


Then I popped it on to a lime green card base, and die cut a number 12 from an Xcut Adhesive Metal Effect Sheet in gold.


Hope you like it, take care and I'll see you next week.

xxx

Two Crafty Sisters, Two Crafty Styles, One Crafty Blog!