Shabby Blogs

Thursday 28 February 2019

Teenager Warning ....

Good morning all, I hope you are having a good week. Today's card is one I made for my grandson last month, but I have been having problems getting the pictures bright enough to use on the blog. The weather was so horrible and grey the last week of January here, that all of my images that I took that week have this awful blue/grey tinge to them.


Anyway, I got this idea from Pinterest, for a teenager warning card, and then I just adapted it slightly to suit my grandson. 


I mocked up the images on the PC and printed them on to glossy photo paper. Then I cut the main image out with a circle die from Spellbinders, so that I could raise it on fun foam for a bit of dimension.


I cut out the text section in to a rectangle leaving a white border, and then ended up raising it the same way using fun foam for dimension. Then I added the panel to a 6 x 4 white note card to finish.


Hope you like it, take care and I'll see you soon.

xxx
Wednesday 27 February 2019

Leaves

Hello.  I'm back today with a simple card made using Tonic Craft kit no14.


We get this set each month and it contains loads of great Tonic products, however I rarely use the stamps and dies!  I decided to rectify that by cutting loads of the leaves from this cut from various brown, bronze and gold card.


I stamped the sentiment from the set using Memento ink in Rich Cocoa and arranged the leaves around it to get an idea for how many were needed.


Once I had a layout I adhered the leaves using Nuvo deluxe adhesive.  I highly recommend trying this if you haven't already.  It is a really sticky glue and grabs quite quickly but still allows some wiggle room.


Once I had my arrangement sorted I trimmed the panel and matted it with a golden brown cardstock from the stash, before adding to a cream card base.
Hope you like it.
TTFN Jude xx

Tuesday 26 February 2019

Birthday Crowd

Good morning all. I hope you are having a good start to the week. Today's card was inspired by the multi-image stamps that some of the design companies came out with last year. 


I've seen ones where there are multiple cats, or snowmen, but I wanted something more personal, so I had a go and created my own.


I used the Three Amigos stamp set from Mama Elephant, this is an oldie, but still one of my favourite sets. The little critters are great without being too cutesy, so I could easily use it for a man.


I stamped my images by masking the main ones and then stamping again behind them, then I just kept masking and stamping until I had filled a 7 x 5 card blank.


I stamped or wrote on all of their little cards and then added colour with Copic Markers. Then I stamped and heat embossed a sentiment onto a strip of black card and added it to the bottom of the card.


Hope you like it, take care and I'll see you soon.

xxx

Monday 25 February 2019

Hearts and flowers

Hello and welcome.
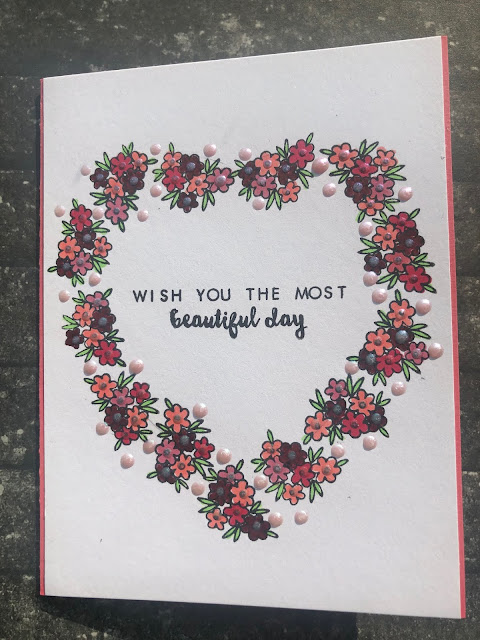
My card for today shows an idea for using the smallest stamps in our sets.


This flower cluster is from the January My Monthly Hero set from Hero Arts.
I drew lightly around a heart die onto my card then stamped the small image to follow the shape.  I turns the stamp around to give different viewpoints.


Once I had the shape stamped I erased the heart and was left with the shape.  I coloured the flowers with Copic markers and added a sentiment to the centre.  This is from the Altenew Beautiful Day set.


As the flowers don't fully fill the shape I decided to add Nuvo drops in between each bouquet.  I also added them to the centres of each flower.  
These are the new Dream Drops in the colour Supernova.  I love the iridescent quality of these drops.


I cut my panel to fit a pink A2 card base with a border down each side.  I'm pleased with the final result and can see me making more in a similar style.

TTFN Jude xx

Thursday 21 February 2019

Re-using pretty things - Bambi Tag

Good morning all Thursday at last, not long now until the weekend, I hope you are looking forward to a crafty one.


I thought I would share with you today a very quick card that I made by re-using a gift tag. I received this beautiful Bambi gift tag on a Christmas present from my brother, and because it was so cute I didn't want to just throw it away.


So I decided I would use it on a card and then someone else can enjoy it too. I went with a very simple design, and used some rose gold satin card to cut a small stitched rectangle from, then to one side I used a double stitched circle die from MFT Stamps to cut a half-circle aperture.


I lined this up on my card base where I wanted it to sit and after lightly marking it with a pencil I stamped my sentiment using Archival Jet Black Ink. The sentiment stamp is a Make and Create stamp from The Works, and I based the size of the circle cut on the size of this stamp.


I added my little Bambi tag on to the rose gold panel, and then finished it off with a few soft peach  sequins and clear dew drops.


Hope you like it, take care and I'll see you soon.

xxx

Tuesday 19 February 2019

Fairy Wishes

Good morning crafty friends, I hope you are having a good week so far. Today's card uses some new to me supplies along with the My Monthly Hero December 2018 Kit from Hero Arts.


I started by using the Altenew Sunburst Stencil with some Altenew Crisp Dye Inks, from the Sweet Dreams collection. I applied the inks through the stencil with a soft brush working from lightest at the top to darkest towards the bottom.


The little fairy is from the MMH kit, and was stamped with Versamark ink and then heat embossed with a Silver Glitter embossing powder from Wow, onto white Vellum.


Then I coloured her from the back with Copic Markers. As she was a little too see-through when I put her against the card, I decided to cut her a few more times from white card, and stack these behind, to give her some dimension.


I added her to my background panel with foam tape, and then added a sentiment from the kit. Then to finish off I added lots of dots with a silver pen and some silver sequins, before I put it all on to a teal note card.


Hope you like it, take care and I'll see you soon.

xxx

Monday 18 February 2019

Lone sailor

Hello and welcome.  I'm back today with another simple masculine card.  
I admit this was copied from a card I saw on Pinterest while I was searching for ideas. You can find the original here.


For this card I used the Hero Arts kit from June 2018 and a selection of Altenew inks.


I stamped the layers of the sea with turquoise, tide blue and starlight from the deep blue seas collection.  I then blended these out with salty ocean distress oxide.


I stamped the cloud with sea breeze and the boat with starlight directly onto my card panel.  I then cut out the sea stamping and added it below.


The sentiment is from the Caped Cuties set by Clearly Besotted.  I stamped 'Happy birthday' on to the same card stock as I used to make the card base.
I then heat embossed this with Wow bright white powder and added to the base using foam tape.


The panel was finally added with glue to my matching card base.  I decided not to add any extra embellishments as I don't think they are necessary.

That's all for today.  TTFN Jude xx

Wednesday 13 February 2019

Wishing you a wonderful day

Good morning all, I hope you are having a good week so far. Today's card is the one I made for my son and daughter-in-law's 4th wedding anniversary which was on Monday.


I used the My Monthly Hero Kit from Hero Arts for January 2019, which is a super pretty kit. 


I started my stamping and colouring the images with Copic Markers and then cutting them out with their matching dies. 


For the background I used Nuvo Mica Mist in Nebula Blue and Turkish Rose. I sprayed them a couple of times each trying to keep the blue more at the top, and the pink more towards the bottom.


Then I used an MFT Blueprints Dynamics Stitched Rectangle die to cut the panel out, and added this to an A2 turquoise/aqua card blank.


I stamped the start of the sentiment on the front of the card, and then finished it off on the inside, then I arranged my images on the front, using foam pads for Dimension.


Hope you like it, take care and I'll see you soon.

xxx


Tuesday 12 February 2019

Circle in a spiral

Hello and welcome.

My card for today features a simple layout that I used on another masculine card last week.


I love the angled lines of this but decided to contrast them with a circular stamped pattern.  This stamp is by Uniko and is called Round in Circles.
I embossed two of the images using Simon Says Stamp embossing ink and Ranger Liquid Platinum embossing powder.

The background was created using three distress oxide inks - Iced Spruce, Fossilized Amber and Hickory Smoke.
I trimmed the panel to fit a black card base and added a silver glitter strip.  I then embossed the birthday sentiment.

Once the card was done I didn't like the brightness of the silver glitter.  To rectify this I masked off the strip and added embossing ink and powder over the top.  Once melted this looked much better.


Hope you like it.  TTFN Jude xx

Monday 11 February 2019

Coffee and Friends


Good morning all, I hope you have had a good weekend. Today's card uses the My Monthly Hero Kit from August 2018.


I stamped my images and then coloured them with Copic markers, before cutting them out with their matching dies.


For the background I used a brick effect stencil with Distress Oxide Inks, which I think were Antique Linen and a touch of Tea Dye.


I then cut the panel out with an Avery Elle Wonky Stitched Ellements Die, and added my coffees on top using foam adhesive on some for dimension.


Then I stamped one of the sentiments from the kit using, Simon Says Stamp Emboss Ink, and heat embossing it with gold embossing powder.


Then I added it to an A2 note card and popped a few matte gold sequins on to finish.


Hope you like it, take care and I'll see you soon.

xxx

Two Crafty Sisters, Two Crafty Styles, One Crafty Blog!