Shabby Blogs

Friday 30 October 2015

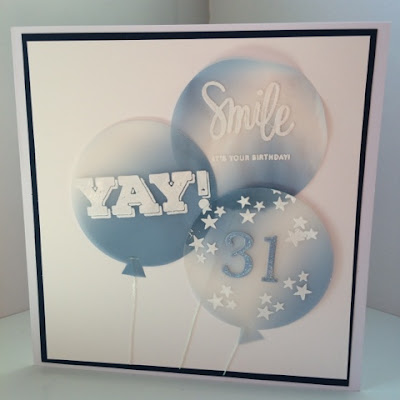
Vellum balloons

Good morning all, hope you have had a good week, and are looking forward to the weekend. I thought we would have a break from the Christmas Cards today and go back to a birthday card that I made last month. 


I used an 8 x 8 blank card for the base and then matted it with dark blue and white card. 


Then I cut three balloon shapes from pale blue vellum using a circle die. First I cut a little notch in the side of the vellum and then left this piece out of the die while cutting. This is what gives you the little 'knot' bit to the balloon. 


I used some sentiment stamps from a couple of Simon Says Stamp sets called Happy and Smile and Big Birthday Wishes. I stamped them with Versamark Ink and then heat embossed them with white embossing powder. 


For the 3rd balloon I heat embossed some stars and then added some dimensional stickers with the recipient's age on, using a sparkly blue sticker to match the card. 


Then I just finished it off with some white twine. Hope you like it, take care and I'll see you soon.

xxx
Thursday 29 October 2015

Stag's head

Hello again.

Today I have quite a masculine Christmas card to share with you.


The latest Creative Stamping magazine came with a set of Christmas stamps.  I loved this stag head and wanted to use it to show how to make a simple non-fussy card for those 'difficult' males in our lives, lol.

I stamped him in Memento Rich Cocoa on to Neenah Sandstorm card and coloured with Copics.  I then inked the edges with distress inks in Tea Dye and Gathered Twigs.

I cut a shape to resemble a shield and  mounted it on papers from the Dovecraft Back to Basics Modern Christmas pack.  These worked quite well colour wise.

Hope you like it.

TTFN Jude xx


Wednesday 28 October 2015

Santa's Seven Dwarfs

Good morning all, I had loads of fun making this card. As soon as I saw this new stamp set from Clearly Besotted I wanted to colour the Santa's up as the seven dwarfs lol. 


The set is called Santa Baby and there are 7 different Santa stamps as well as a few sentiments in it. So you can tell how my mind works ;o))


I stamped all of the Santa's with Tuxedo Black Memento Ink and then coloured them with Copic markers, using a picture of the Seven Dwarfs that I found online to give me the basic colours for their suits. I then cut them all out by hand!


I used two different sized punches for the circles and then laid them out on to a 7 x 7 card blank. I chose a plain background as I wanted the Santa's to stand out. But then teamed it with the bright gold card for a bit of impact. 


The sentiment is from the same stamp set and this was stamped with Jet Black Archival Ink and then matted with some of the gold card. I used an old Sizzix die for the 'Ho' and a Taylored Expressions die for the 'Hi' - just because adding 'Hi Ho' made me smile lol.


Hope you like it, take care and I'll see you soon.

xxx


Tuesday 27 October 2015

Cosmic Christmas

I've been playing with inky backgrounds lately, trying to make a night sky effect.  I'll share some of my other efforts later but I thought you might like to see my universe version.


I started by stamping and heat embossing a sentiment on to my card using a shiny black.  I then added different Memento inks to make the background.  I used Pear Tart, Sky Blue, Paris Dusk and Pearlescent Crimson.

Once I had laid down all the colours I sprayed it lightly with water, then Cosmic Shimmer Vintage Mists (Marigold, Egyptian Blue and Patina) and Mister Huey's colour mist (Opaque White).


Once these were dry I added extra dots of white and gold with Sakura pens then embellished with a few sequins.  
At this point I wasn't happy with how the sentiment looked. It no longer stood out so I decided to stamp again and raise the panel on foam tape.  A few more sequins finished it off.

This makes a very modern looking Christmas card but you could add a sentiment for any occasion.  
Hope you like it. 

TTFN Jude xx

Monday 26 October 2015

Hanging Hearts Christmas Card

Good morning hope you have all had a good weekend. It's another Christmas card today, this one I made after seeing this lovely card on Pinterest. Again I used the supplies I have to make a similar card.


I started with a red 4 x 6 card base and then cut mats from white and Kraft card. I used part of an MFT Stamps Blueprints set to add a stitched border to the top layer. 


Then I stamped a branch using Versamark ink and heat embossed it with True White Cosmic Shimmer embossing powder. I cut the branch out by hand and cut the leaves off to leave the branch bare. 


For the hearts, I used a Paper Smooches hearts die and cut them from white and red card. Then I punched a tiny snowflake from one of the hearts so you could see the red through. As it didn't show enough for me, I punched the snowflake again with red card and fitted it into the aperture. 


For another heart I punched a tiny red heart from red card and stuck this to the front. Then I used a sentiment from the Simon Says Stamp, Be Joyful set with Versamark ink and heat embossed it with white embossing powder. I used simple white string to tie the hearts on and stuck it with Cosmic Shimmer glue.


Hope you like it, take care and I'll see you on Wednesday.

xxx


Friday 23 October 2015

The Last Elf

Friday at last and also the last elf - for now ;)

(Please excuse the pictures but I took them quite late, hence the lack of light and the shadows!)


Again I've used MFT's Santa's Elves and made a scene card.


The little man has glossy accents on his bell, buttons and eyes.


I've also added GA to the star on the tree, but this time I've used gold pen to highlight the tinsel strands.


The sentiment was stamped and embossed in pure white, which makes it stand out nicely on the blue background.  
Hope you like it.


Have a great weekend. TTFN Jude xx

Thursday 22 October 2015

Gold Baubles

Good morning all, today's card is one I made after seeing this lovely one on Pinterest here. I didn't have the same materials and supplies but I made use of what I had and I'm quite pleased with the result. 


I started by cutting a piece of white card stock to the right size for a 7 x 5 card blank and then cut mats in gold and black card for behind it. 


Then I used a snowflake bauble die to cut the aperture in the white card and the baubles from gold card. 


Then I ran the white card through a snowflake embossing folder from Crafters Companion, and added a shaker pocket behind the bauble aperture full of gold and silver sequins and seed beads. 


I added the baubles to the front and then coloured some white twine with my gold Wink of Stella pen to give me gold hangers for my baubles. Then I glued these down with Glossy Accents glue. 


To finish it off I added a sentiment from a Simon Says Stamp Christmas set and heat embossed it with Cosmic Shimmer Bright Gold embossing powder. 

Hope you like it, take care and I'll see you soon.

xxx


Wednesday 21 October 2015

Christmas Pals

Happy Wednesday!

You'll be glad to know I've given you a break from the elves today (but they will be back!)


This is made using the Toboggan Together set from Lawn Fawn.


I stamped all four of the critters in the set but put three of them in a picture frame.


The little penguin is then being naughty and throwing snowballs at the pictures of his friends - lol!


The greeting is from Winter Scripty Sayings, also by LF.


Hope you like it.  

TTFN Jude xx

Tuesday 20 October 2015

Letter tile card

Good morning all, hope you are well. Today's card is one of those that I really had no idea where it was going until it was finished lol. 


I needed a male card and I stamped and cut the tiles using my wooden alphabet tiles and my 0.75 inch square punch. 


After that I was just sort of looking around the craft room for inspiration when I saw the Hickory Smoke Distress Ink. So I picked some card that went with it and got to work. 


I ran a piece of white card through a diamond embossing folder and then inked it around the edges with the Hickory Smoke ink. Then I positioned the letter tiles on it using foam pads and matted the piece with the green and black card and put it all onto a 7 x 5 card blank. 


To finish it off I used an eraser on the end of a pencil to add ink dots in grey and green ink, I like that these don't always give a perfect result, it's a bit more natural lol. 


Hope you like it, take care and I'll see you soon.

xxx

Monday 19 October 2015

More elves

Hello I'm Judy and I'm addicted to elves - lol!

I realised yesterday that all the cards I've made this week have had elves on them.  I think it's time I found some other stamp set to use :)  Until then you will have to put up with the elves!

This one combines the MFT set with one from Lawn Fawn, called Trim the Tree, and a background die from Marianne.

I overfilled the tree so that it looks like this little elf has no where to put his decoration. 

While this little chap is waiting to start adding the gifts underneath!  In my head I had a whole story to go with this scene lol :)


I used a sentiment from the Toboggan Together set to finish off.


Hope you like it.


TTFN Jude xx


Two Crafty Sisters, Two Crafty Styles, One Crafty Blog!