Shabby Blogs

Tuesday 31 July 2018

Cornflower Poppies

Good morning all, I hope everyone had a good weekend, and a good start to the week.


Today's card was made with the Clearly Besotted Pure Poppies stamp and die set. But for something a bit different, I decided to stamp the poppies using blue inks. So they are more Cornflower Poppies lol.


I used Altenew Crisp Dye Inks, from the Deep Blue Seas set, to stamp the poppies on to white card. I masked and stamped until I was happy with the bunch, and then added in the stems with Altenew Inks from the Tropical Forest set.


I stamped a couple of the poppies onto a separate piece of card, and die cut them, to raise them on top of my panel.


Then I cut the panel down to fit an A2 note card, and used striped Washi Tape down each side as a background.


Then to finish it off, I stamped the sentiment from the Altenew Family Matters set, in matching inks.


Hope you like it, take care and I'll see you soon.

xxx
Monday 30 July 2018

Summer blooms

Morning all.  The end of July means the summer school holidays and clear roads getting to work.  For those of us without children in school it's a great time but I know for parents of youngsters the summer holidays aren't all fun.  If that's you, try not to stress!  Craft instead 😁


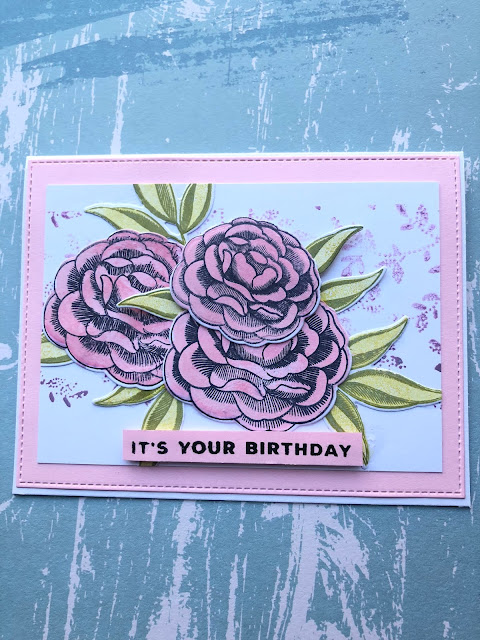
Today's card is made using an old Clearly Besotted set called Sketched Blooms.  If you go looking in their store you will find a newer version of this, which looks totally different.  The closest I can see to the same flower is Blooming Marvellous.


 Using Dusty Concord Distress Oxide I stamped a strip on a piece of white card, cut to 3.75 x 5 ins, with a background from Stampers Anonymous. I added this to a pink mat cut with an MFT stitched rectangle.


The flowers were stamped with Spun Sugar oxide and a light layer of Worn Lipstick over top.  I stamped the outline with black Archival.

The leaves are Crushed Olive and Old Paper oxides.  I layered these, together with the flowers, using glue and adding foam squares under the edge of the smallest flower for a little dimension.


The sentiment is from Simon Says Stamps Big Birthday Wishes.

I really like how this looks.  What do you think?

TTFN Jude xx

Thursday 26 July 2018

Wreath building

Welcome back.

I have been watching videos where the presenter has used the Gina K wreath builder kit.  We don't have this so we made our own.  It isn't perfect but works well enough for our purposes.


I started by putting the template into the MISTI and marking one corner of a piece of white card.  This would be the corner that is placed into each section of the template as I stamped.


This shows how I set up to stamp my first image.
After that was done I rotated the paper into the next corner and stamped again, then to the third, and so on until I had a full circle of flowers. 


I continued using different Simon Says Stamp stamps and Altenew ink colours until I had a completed wreath.  This is so easy to do and can be done without the template too, although I think it would be much more difficult without a stamping platform.


To finish off I found a circular sentiment from an older Simon Says Stamp set, and black embossed it on white card.  I then took a circle punch and cut it out.


I added the sentiment to the centre and that was all my card needed.

These type of designs are so easy to do and multiples can be made at the same time.  Why not give it a try.

TTFN Jude xx

Wednesday 25 July 2018

3D Embossing Folder Background

Good morning all, I hope you are having a good week. Today's card is another 30th birthday card, but to be honest, without the numbers and a different sentiment, it could be used for many occasions.


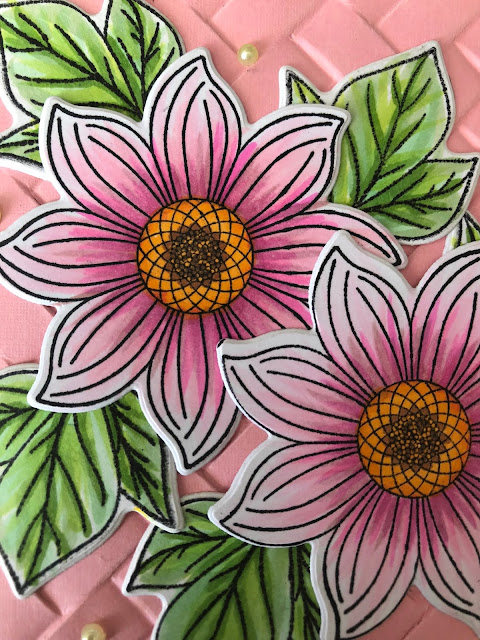
I used a We R Memory Keepers, 3D Embossing Folder in a basket weave effect for the background. I've used this one before but not on coloured card, and I do think you see the effect better.


The flowers and leaves are from a recent Simply Cards and Papercraft magazine, I love the size and shape of them, perfect for focal elements. I stamped them with Tuxedo Black Memento ink, and coloured them with Copic Markers. 


After I cut the flowers and leaves out, I cut the background panel to fit an A2 note card and then laid out the flowers and leaves onto the background until I was happy with the placement.


I stuck the leaves with wet glue, and layered the flowers using 2 different depths of foam tape.


Then I heat embossed a simple sentiment on to black card, using white embossing powder, and finished the card with the black number stickers and a few pale green pearls.


Hope you like it, take care and I'll see you soon.

xxx

Tuesday 24 July 2018

Carousel ride

Hello and welcome.
My card for today again uses the July My Monthly Hero kit from Hero Arts.


I cut the frame die twice - once from cream and again from turquoise card.  I then used the die cuts from one to paper piece into the other.


I love how this looks.  It reminds me of the Big Top at the circus!

I liked how some of the images from the set fit inside the oval in the centre of the frame.  I decided to stamp the carousel in there.  I then popped this up on foam tape.


I stamped the sentiment and embossed it with black embossing powder.  I then fish-tailed the ends and added this with foam tape too.


This is such an easy card, even if it does take quite some time to glue each die cut back into the main frame.

Hope you like it.  TTFN Jude xx

Monday 23 July 2018

Birthday Chick

Good morning all, and welcome to the start of another week. If like us you are having some seriously warm weather, I hope you can enjoy it. I have had my granddaughters here for the last couple of days, so it's nice that they can get outside and play.  


Today's card is one of the ones I made for my daughter's 30th birthday last week. I used the Birthday Chicks stamp set from MFT Stamps.


I used a Die Cut Label from Spellbinders, and stamped the chicks with Tuxedo Black Memento Ink, then I coloured them with Copic Markers.


As I don't have the dies to go with this set, I cut the little balloon out by hand, which is why it's a bit messy lol. Then I added small black 30 stickers to it, and a small pearl heart.


For the background I used a piece of patterned paper from a Simon Says Stamp kit from last year. I really love the dark blue with the Rose Gold stripe. I die cut, it with an MFT Blueprints stitched rectangle die, and put it onto a plain white card base.


Then I stamped one of the sentiments from the set, and mounted it with rose gold card, then added this and the main panel to the background using foam tape for dimension.


Hope you like it, take care and I'll see you soon.

xxx

Friday 20 July 2018

A ray of kindness

Hello again. Today's card combines a focal point from an older Simon Says Stamp card kit with a new background die from Hero Arts.
Please excuse the pictures but I'm struggling with getting the conditions right for good photos!


This month's My Monthly Hero Kit has a lovely die which looks a little like rays from a sun.


I cut this one from a cream card and used the negative to know where to add glue so that the cut outs would sit properly.


The stamp for the floral image is from a set called Kind Flowers.  I heat embossed it in gold and coloured with Zig Clean Colour markers and a water brush.


The small sentiments are from the same stamp set and again are embossed in gold on cream.  I added a gold matt behind them for definition.


The centre image is raised on foam using the oval that is cut by the centre of the die.

That's all for this week.  See you soon.

TTFN Jude xx

Thursday 19 July 2018

3D Embossing Folders

Good morning all, I hope you are having a good week. Today's card is one I tried after watching another of Jennifer McGuire's fabulous videos.


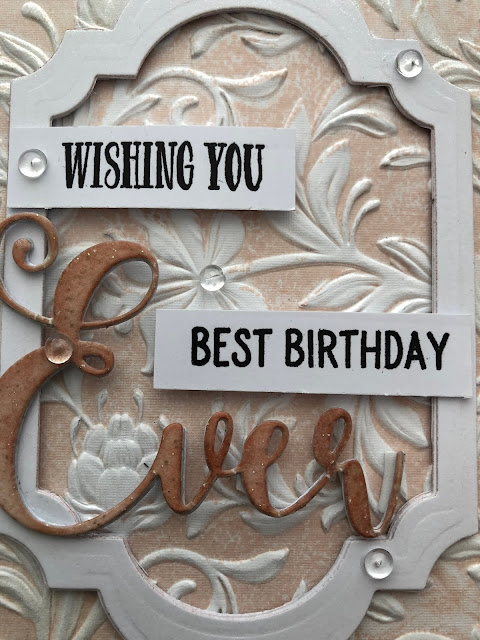
It uses one of the new 3D embossing Folders from Tim Holtz, this one came in a recent Simon Says Stamp kit. 


I inked the flat side of the folder with Simon Says Stamp, Pale Blush Pink ink, and then put a piece of plain white card inside and ran it through the Bigshot.


The resulting look from the white embossed flowers and the coloured background is really lovely, so I will definitely be trying this again.


I then used a Spellbinders frame die in 2 different sizes to cut the centre piece, I cut 4 of these and layered them together for dimension.


Then I added a sentiment made from a Lil Inker's, Ever die and stamp set, and a Clearly Besotted stamp set. The Ever is coloured with the same blush pink ink, applied to the die cut directly from the ink pad, which makes it look darker!


Then all it needed to finished it off was a few plain dewdrops. Hope you like it, take care and I'll see you soon.

xxx

Wednesday 18 July 2018

A Night at the Carnival

Hello and thanks for being here.
Today's card was made using the July My Monthly Hero kit from Hero Arts.


This set has these lovely silhouette stamps as well as many funfair images.  I can see some fun cards coming from this.


I started by creating a sunset background with Distress Oxides.  For this I used Squeezed Lemonade, Fossilised Amber and Candied Apple.  I then stamped my dark images over top.


I really liked how this looked so I made a second version using blue inks - Broken China, Salty Ocean and Faded Jeans.
Unfortunately this time I messed up the sentiment and had to add it again.  I stamped on another piece of card, inked with lightly with Faded Jeans and Broken China and raised it with foam squares over the original.


I definitely prefer the cleaner look of the first card.  How about you?

TTFN Jude xx

Two Crafty Sisters, Two Crafty Styles, One Crafty Blog!